How to Sync an MPC with Pro Tools: A Step-by-Step Guide
Hello and welcome! I’m Jeldon. Today, we’re exploring an essential topic for producers and engineers: syncing an MPC with Pro Tools (or any DAW). This tutorial will focus specifically on internal virtual MIDI connections, though the process also applies to external MIDI devices.
Whether you use cables or keep your workflow virtual, syncing ensures it stays smooth, efficient, and error-free. Let’s get started!
Step 1: Preparing Pro Tools for Synchronization
To ensure a seamless connection, start with these Pro Tools settings:
1. Access Preferences:
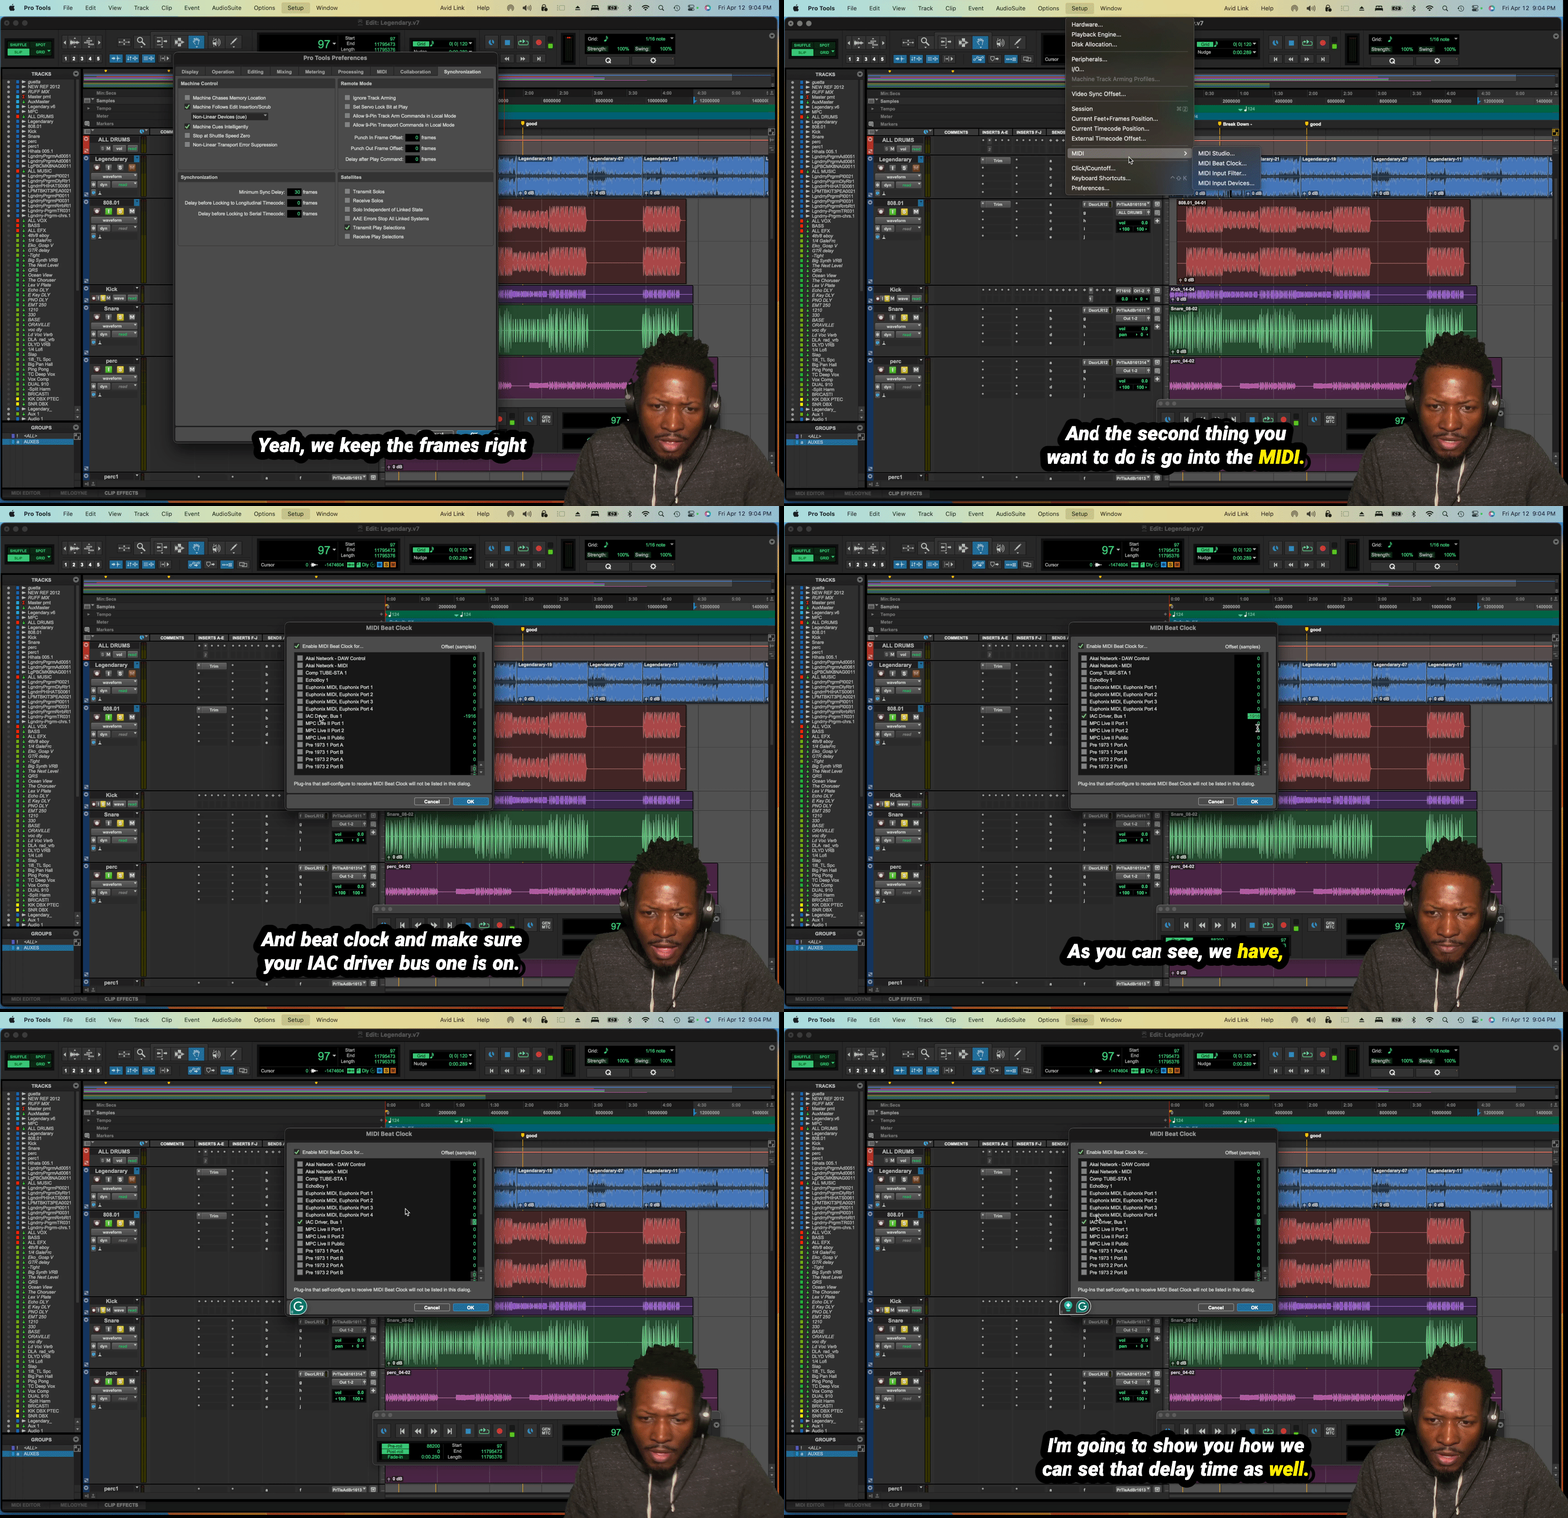
- Navigate to `Setup > Preferences > Synchronization`.
Ensure Transmit Play Selection is enabled.
Leave the Receive Play Selection unchecked.
2. Configure MIDI Beat Clock:
- Go to the `Setup > MIDI Beat Clock`.
- Enable the IAC Driver Bus 1.
- Set the delay time to zero initially.
3. Enable IAC Driver on macOS (if applicable):
- Open the `Audio MIDI Setup` tool and select the MIDI Studio view.
- Make sure the IAC Driver is online.
Step 2: Setting Up Your MPC
Using an MPC Live II, follow these steps:
4. Switch to Controller Mode:
Connect your MPC to the computer and enter Controller Mode. This syncs your MPC with Pro Tools, enabling real-time control.
5. MIDI Settings on the MPC:
- Go to `Menu > Preferences > MIDI/Sync`.
- Disable all inputs/outputs for the IAC Driver to prevent MIDI loop errors.
- Enable MIDI Clock and MIDI Machine Control (MMC).
- Ensure the MTC Frame Rate matches Pro Tools settings (e.g., 30 fps).
6. Assign Tracks to Outputs:
- In the MPC, assign individual tracks to their audio outputs (e.g., Kick to Channel 10, Snare to Channel 11).
- Use stereo outputs for elements like 808s if necessary.
Step 3: Testing the Connection
7. Playback Sync Test:
- In Pro Tools, press play to verify synchronization. Your MPC should respond immediately, reflecting playback actions.
8. Correcting Delays:
- If you notice timing discrepancies (e.g., kicks or snares out of sync), measure the sample offset.
- Adjust the MIDI Beat Clock Offset in Pro Tools by entering the calculated negative offset value.
9. Session Setup:
- Confirm your Time Code Rate in `Setup > Session.` Ensure it matches the MPC (e.g., 30 frames drop).
Step 4: Recording Individual Tracks
Now that sync is established:
10. Route MPC Outputs to Pro Tools Channels:
- Assign each MPC track to a Pro Tools channel.
- Mute unnecessary group channels to avoid audio conflicts.
11. 2. Record and Refine:
- Record each track individually, starting with the kick and snare for timing reference.
- Use the Pro Tools Tab to Transient feature to align tracks perfectly.
Troubleshooting Tips
MIDI Keyboard Issues: If you use a MIDI keyboard (e.g., Novation), temporarily disable it to prevent interference with the MPC.
- Virtual vs. External MIDI: While this tutorial focuses on virtual MIDI, the same process applies to external devices with minor adjustments.
- Delay Compensation: Pro Tools allows fine-tuning delay compensation for external devices under MIDI preferences.
Taking It Further
This method isn’t limited to Pro Tools. Similar setups can be used with Logic, Ableton, Fruity Loops, or Cubase. The principles of MIDI sync are universal, and experimentation is key.
Conclusion
Syncing your MPC with Pro Tools might seem daunting initially, but it becomes second nature with practice. Remember, syncing MIDI tracks individually offers precision and flexibility, allowing you to spot and fix errors efficiently.
If this tutorial helped you, please like, subscribe, and stay tuned for more tips on production workflows. Have a great day, and happy creating!

Leave a Reply